Table of Contents
Workflow Using OpenOffice Draw Exporter
Preface
For your information, the most recent version of BKChem was 0.12.0_pre3 at the time of writing this article.
As a preface, I would like to point out the dis-/advantages of this method using the OO (OpenOffice Draw) exporter.
The workflow will result in a file that is scalable and can be imported into OO. This means you can resize the picture to your liking without a grainy final picture on the print.
However, extra work is needed! Because you have to recreate curved arrows in OO. I guess the exporter needs to be updated to ease this.
Workflow
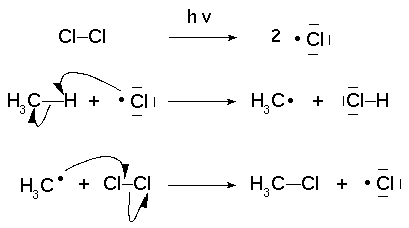
The following radical mechanism serves as an example. All alignment work has been done in BKChem, the drawing is in the state of “ready-to-be-printed-for-contribution”:
Export
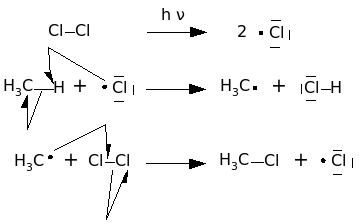
You export this with “File- Export- OpenOffice Draw” and should see something like the following in OO 2.2.0, if you open the file.
You can see curved arrows are broken. We are going to fix this manually. As a rule of thumb for arrows: Try to use “Curve” for arrows and to use the least possible amount of control points. The less control points, the less to mess up, the more power you have over the drawing.
Select an arrow and check “Edit- Points”, this allows editing of single points, instead of resizing the arrow. Checking “View- Toolbars- Edit Points” now is a good idea. You should see 3 green rectangles. Place the arrowhead endpoint at the start of the wedge.
Now select the rectangle in the middle, it turns dark green. If it does so press “DEL” on your keyboard, this deletes it. Now select the third rectangle, you have not touched so far. Click on the “Edit Points Toolbar: Corner Point” button (5th from right). A green point (called handle) with a slashed line to the rectangle should appear. Adjustments of the arrowline path should be done with handles.
The other rectangle has such a handle now too, but it sits on top of the rectangle and you cannot see it at the moment. If you want to move the endpoint at the arrowhead you move this point at first, that is why you relocated the endpoint for the arrowhead first. Of course, you can deselect the arrow, the select it again and move the arrowhead endpoint around without the gree point, try it for yourself. If the points move only in defined distances you have to uncheck “View- Grid- Snap to Grid”.
Note: If arrowheads of normal arrows are too big in size select all of them, “RMB- Line…” on one of them. In the Line tab in the “Arrow styles” section below the drop down menu that reads ”→ Arrow” (or ”← Arrow”) for style use a width of “0,20cm” (only one click on the down button). Press OK. This method does not work for half-arrowheads.
Note2: You can move/resize/rotate atom marks now too. Double LMB (Left Mouse Button) the atom that has marks. Everything else should grey out. LMB on the sign and fix it. To leave this mode double LMB on empty space.
For saving the fixed drawing is use the ODG file format. Do you remember that you have opened a SXD file?
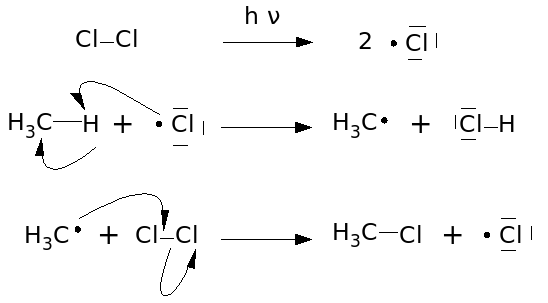
The final drawing should look like the following image.
And here you can download the SVG and final ODG file. radikalmech00-files.rar
How to use this drawing with OpenOffice Write?
“File- New- Text Document” opens a blank text document. “Insert- Object- OLE Object…” allows you to import the drawing. On the “Insert OLE Object” window select “Create from file” radio button and click the Search button and point at the drawing. If you check “Link to file” all changes you make to the drawing inside of OO-Write will be applied to the file itself. Otherwise a copy of the drawing will be saved in the text file and you edit that, leaving the original file alone.
Note: If you want to resize the drawing area double LMB on the drawing and resize that windows. Else the drawing itself will be resized! Wait for OO to change the border of the drawing, it takes a bit of time. The drawing should be visible in this new window, else it will not be drawn!
Other Programs for ODG Creation
SVG importer for OpenOffice
http://www.ipd.uka.de/~hauma/svg-import/ I tested svg-import-1.2.2.oxt which is approximately 6MB. You add it via “Tools- Extension Manager…- My Extensions- Add…” This importer has at the time of writing some issues with saved and exported SVG files from BKChem.
- curved arrows are not properly placed
- H3C will be displayed as H3C
- bonds and marks are not in right location
ODG export from Inkscape
Here you import SVG files from BKChem into Inkscape, then export to ODG. The ODG exporter seems to be broken on 0.45.0 (latest on Ubuntu 7.04) because it crashes, even with an empty page to export. Latest Inkscape version is 0.45.1 (self-compiled) at the time of writing. This one does not crash. Unfortunalety, this method has issues too:
- normal arrowheads are not displayed
- text, plus signs, and atoms are not displayed
- atom marks and bonds are displayed
Other Programs To Publish Drawings
Scribus
Imported SVG (exported and saved from BKChem) files are drawn as boxes without content. Furthermore, the SXD import (exported from BKChem) crashes Scribus version 1.2.5. Version 1.3.3.8 gives the same results.
Latex / Lyx
The standard file format for inclusion of graphics is encapsulated postscript (EPS). BKChem has three different options for exporting postscript, all of which give slightly different results; overall the one based on piddle seems to work best. To avoid bounding box issues, activate the autocrop option (File → File properties → autocrop images) before exporting the file.
If you use PdfLatex, EPS cannot be used - in this case, just export to PDF instead of EPS. The autocrop option should still be set.
Untested So Far
I am just dumping program names that come to mind. Have to test them later. lynx? GOffice? KOffice? Abiword?


